- Shopping, made easy.
- /
- Get the app!
Features:
1.Works with a Pi2/Pi3 or Pi4 (USB connector positions swapped)
2.Uses the Cmedia CM119B USB audio IC
3.Uses a NiceRF SA818 UHF or VHF embedded radio module
4.500 to 1000(default) milliwatts RF output power
5.Small, portable with self contained radio and antenna
6.Radio settings changed using a program running on the Raspberry Pi
Required Hardware:
1.A fully assembled SHARI Pi3U, Pi3V, Pi4U or Pi4V.
2.A Raspberry Pi 2, Pi 3 or Pi4 . The Pi2 or Pi3 is normally used with the SHARI Pi3(U) ,while the Pi4 is normally used with the SHARI Pi4(U)
3.A case for the Raspberry Pi. A metal case is preferred but if you want to use a WiFi connection instead of a wired network connection then a plastic case may be required to obtain adequate range.
4.A micro SD card – 16GB or larger, Class 10 or better is recommended.
5.A power supply for the Pi-This should be a power supply intended for the version of the Raspberry Pi. These supplies typically provide 5.1 to 5.2 VDC to the Pi. Current requirements vary with version. Numerous problems with Allstar Nodes have been traced to inadequate power supplies.
SHARI Allstar Node Setup and Configuration Guide (In short version)
1.Create an Account with Allstar
2.Create a Server and Request a Node number
3.Software
4.Configuring Allstar
5.Configuring SimpleUSB-Tune-Menu for SHARI
6.Connecting and Configuring SHARI
7.Setting Receive and Transmit Voice Levels
8.Testing DTMF Decoding
9.Enabling the COS LED
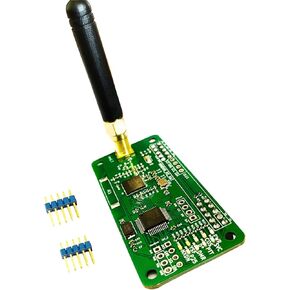 MMDVM Hotspot Board (V1.5.2) + Antenna Support UHF VHF Support P25 DMR YSF DSTAR NXDN POCSAG for Raspberry Pi-Zero W, Pi 3
KWD 11.500
MMDVM Hotspot Board (V1.5.2) + Antenna Support UHF VHF Support P25 DMR YSF DSTAR NXDN POCSAG for Raspberry Pi-Zero W, Pi 3
KWD 11.500
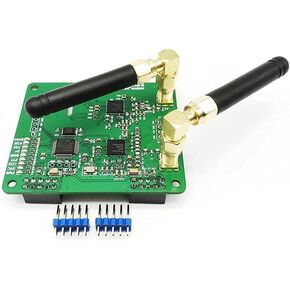
 MMDVM Duplex Hotspot Module Dual Hat V1.5.2 Support P25 DMR YSF NXDN DMR Slot 1 + Slot 2 for Raspberry pi with USB Port (with OLED)
KWD 20.500
MMDVM Duplex Hotspot Module Dual Hat V1.5.2 Support P25 DMR YSF NXDN DMR Slot 1 + Slot 2 for Raspberry pi with USB Port (with OLED)
KWD 20.500
 SDR Radioberry V2.0 for Raspberry Pi 4 - Radio Card Analog Devices AD9866 & 10CL025 12-bit Broadband Modem for Ham Radio SDR Transceiver Software Defined Radio (Radioberry)
KWD 24.500
SDR Radioberry V2.0 for Raspberry Pi 4 - Radio Card Analog Devices AD9866 & 10CL025 12-bit Broadband Modem for Ham Radio SDR Transceiver Software Defined Radio (Radioberry)
KWD 24.500
 MMDVM Duplex Hotspot Module Dual Hat with V1.47 Support P25 DMR YSF NXDN DMR Slot 1 + Slot 2 for Raspberry pi (Without OLED)
KWD 16.500
MMDVM Duplex Hotspot Module Dual Hat with V1.47 Support P25 DMR YSF NXDN DMR Slot 1 + Slot 2 for Raspberry pi (Without OLED)
KWD 16.500


