- Shopping, made easy.
- /
- Get the app!
Reassemble: If the screen tests Repairing a tablet screen may involve the following steps and precautions: Observe and inspect the screen condition: When repairing a tablet screen, start by carefully observing the condition of the screen, including any cracks, scratches, black screen, or abnormal color issues. Prepare repair tools: Repairing a tablet screen requires some common repair tools, such as screwdrivers, pry tools, suction cups, and tweezers. Ensure that you have all the necessary tools and required components. Disassemble the tablet casing: To repair the screen, you will usually need to remove the tablet casing. Gently remove the casing using a screwdriver or other tools and take extra care not to cause further damage. Disconnect power and battery: Before conducting any repair work, ensure that the tablet is disconnected from power and the battery is removed to avoid electrical hazards or battery short circuits. Remove the screen: The steps for removing the screen may vary depending on the tablet model and design. Typically, you need to delicately remove screws, cables, and connectors from the screen. Be mindful not to apply excessive force to avoid damaging the screen and its connectors. Replace the screen: If the screen is damaged and needs replacement, depending on the situation, you can purchase a brand new screen or look for a used screen of the same model. Ensure that the new screen is compatible with the tablet and follow the instructions or technical guidance for connection and installation. Test the screen: Before reassembling the tablet, it is essential to test the new screen's performance. Connect the power and switch on the tablet, check if the screen displays properly, and ensure there are no abnormal colors or touch functionality issues. Reassemble: If the screen tests successfully, reassemble the screen by securely attaching connectors, screws, and other components. Ensure that each part of the tablet casing is correctly connected and instal
 SECRETIGER Replacement for Microsoft Surface Pro 5 6 1796 1807 1809 12.3 inch LCD LED Display Touch Screen Digitizer Assembly (with Touch Plate and Adhesive Stripe)
KWD 61
SECRETIGER Replacement for Microsoft Surface Pro 5 6 1796 1807 1809 12.3 inch LCD LED Display Touch Screen Digitizer Assembly (with Touch Plate and Adhesive Stripe)
KWD 61
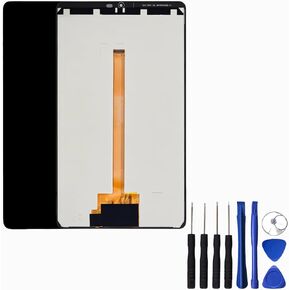 Replacement for Samsung Galaxy Tab A9 SM-X110 8.7 inch TFT LCD Display Touch Screen Digitizer Assembly Replacement Tablet Black
KWD 11
Replacement for Samsung Galaxy Tab A9 SM-X110 8.7 inch TFT LCD Display Touch Screen Digitizer Assembly Replacement Tablet Black
KWD 11
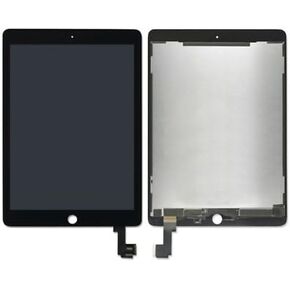 LCD Display Touch Screen Digitizer Assembly for iPad Pro 9.7'' A1673 A1674 White
KWD 44
LCD Display Touch Screen Digitizer Assembly for iPad Pro 9.7'' A1673 A1674 White
KWD 44
 SECRETIGER Power Volume Button Ribbon Flex Cable Replacement for Samsung Galaxy A14 5G A146U A146P A146U1 SM-S146VL - Power(On Off)/Volume Button/Side Buttons Key Replacement Set
KWD 3
SECRETIGER Power Volume Button Ribbon Flex Cable Replacement for Samsung Galaxy A14 5G A146U A146P A146U1 SM-S146VL - Power(On Off)/Volume Button/Side Buttons Key Replacement Set
KWD 3


